
Data Upload Workflow
This example workflow demonstrates how to push data to Alteryx Connect from Designer via the REST API.
To complete this workflow, you will need:
- Connect v2 server
- Designer and the Connect v2 tools
This workflow assumes you have created the county.xml and load-alteryx-counties.xml configuration files from Configuration Files Creation Example and uploaded the files to Connect with the Configuration File Upload Workflow.
Download or create this workflow by following the steps below.
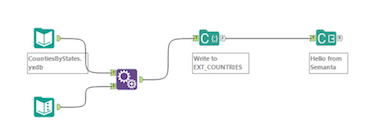
- Open a new workflow and drag an Input Data tool onto the canvas.
- In the Configuration window, use Connect a File or Database to browse to CountiesByStates.yxdb, located in the Designer sample data folder.
-
Configure the Text Input tool:

"SDKtest" acts as a load code, allowing users to load into a stage table from a different source system without impacting previously loaded data.
- Connect the configured input tools to an Append Fields tool to add the LOAD_CODE to the dataset.
- Add and connect a ConnectJson Builder tool.
- Configure the ConnectJson Builder tool:
- Table Name: EXT_COUNTRIES
- Add and connect a ConnectOutput tool.
-
Configure the ConnectOutput tool:
- Connect Server URL: http://localhost
- Login: admin
- Password: Conn3ct!
- Remove Pre-existing Data For This Loadcode: SDKtest
-
Connect Job To Be Executed: load-alteryx-coutries
This is the ID Connect uses to access loaded values.
- Run the workflow to load the data into Connect.
-
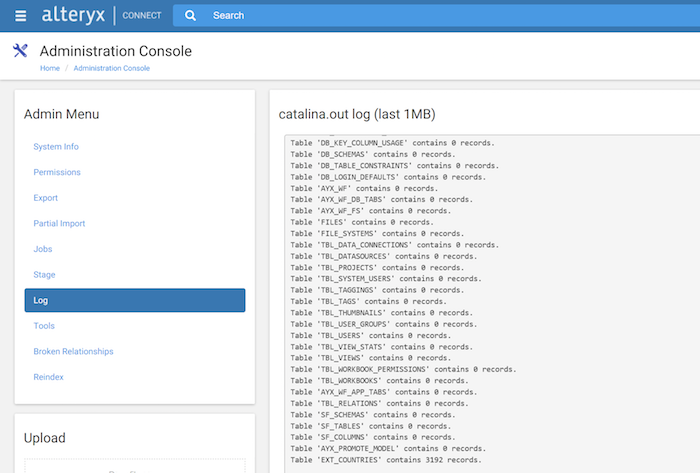
Click Administration. To verify that records were submitted to the correct table:
-
Click Stage and check Load Code SDKtest and verify that Statistics reads "3,192 in EXT_COUNTRIES".

-
Click Log and find the line "Table 'EXT_COUNTRIES' contains 3,192 records."
-
- Return to the home page.
-
Click Data Sources and verify that Countries Example is populated.